 Niall Maher4 min read
An Intro to JSON Web Tokens (JWT) for Web Developers (with Node.js)
Today, we'll dive into JSON Web Tokens (JWTs), a standard for securely exchanging data on the web.
Have you ever wondered how web applications keep track of logged-in users as they navigate from page to page?
Well, in many modern applications, the answer lies in using tokens, and JWTs are one of the favourites.
A JWT is a compact, URL-safe format for representing "claims" (fancy speak for data or data) that can be shared between two parties.
The major bonus of a JWT is that it's self-contained; it carries all the necessary data within itself, so there's no need to hit the database more than once. So for commonly used pieces of data, such as a user's role, it can be handy to keep it in the token.
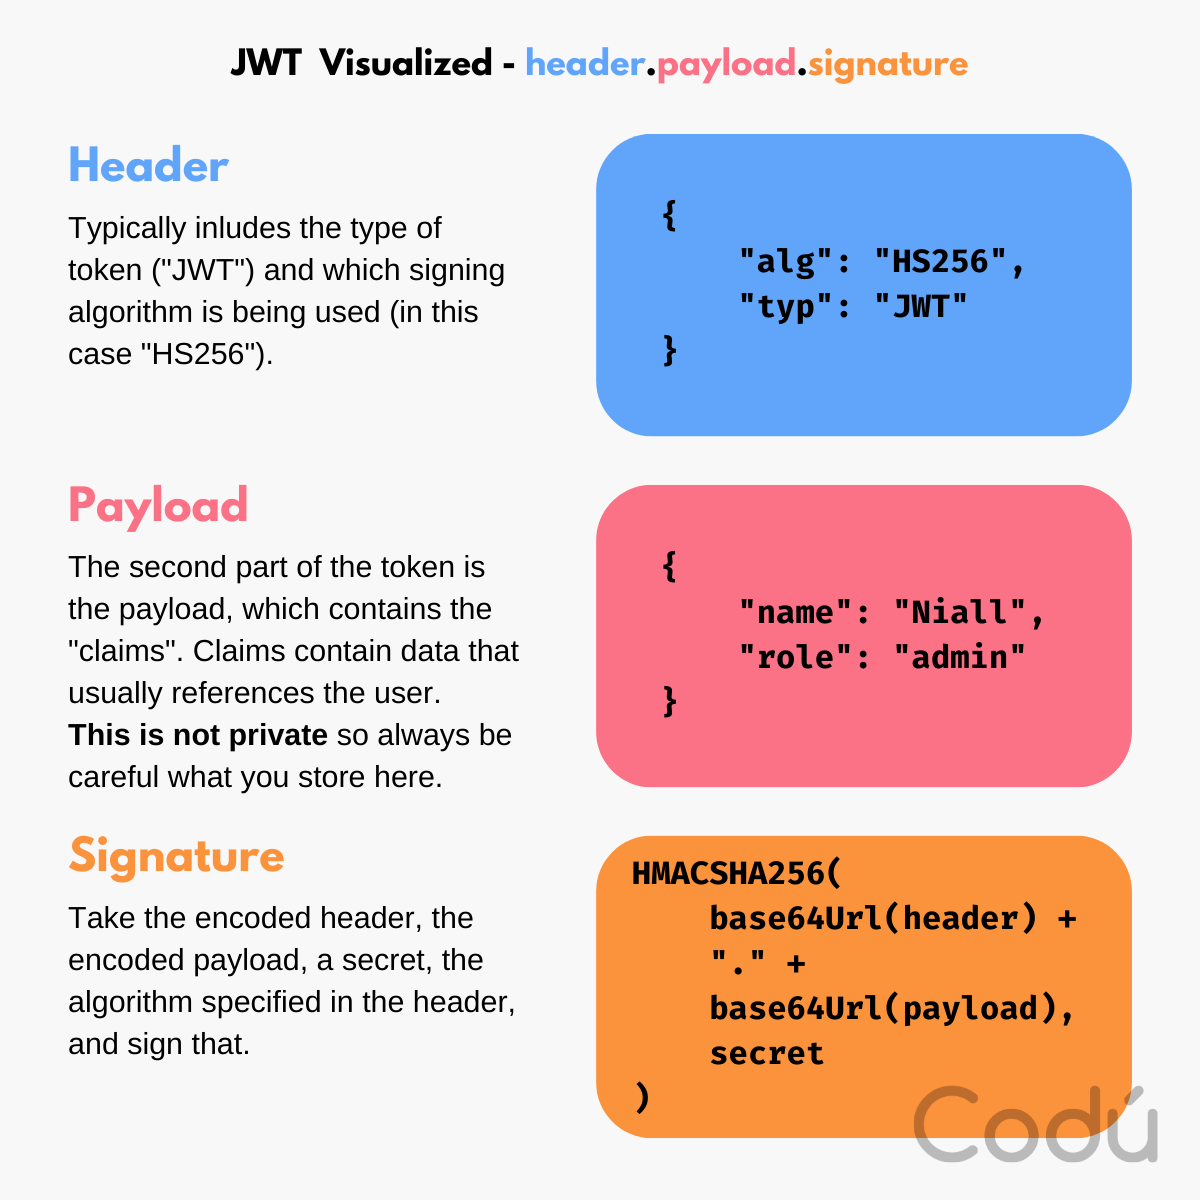
The makeup of a JWT
A JWT typically consists of three parts, separated by dots: a header, a payload, and a signature (e.g., XXXXX.YYYYY.ZZZZZ).
Header: This is the metadata part that includes the type of the token (JWT here) and the signing algorithm (like HMAC SHA256 or RSA).
Payload: Here's where the actual user data or claims are stored.
Signature: This part is crucial for the integrity and security of the JWT. It verifies that the JWT sender is authentic and that the token hasn't been tampered with en route.
Here's a visualized example of what you might expect to see in the makeup of a JWT:
Don't put secret information in the payload or header elements of a JWT (unless it is encrypted). This data is simple to decode (and is optimized for speed). Just pop over to jwt.io, and using their tool, you can paste in a JWT, and you will see the contents. JWTs are protected against tampering but not against reading.
To solidify your understanding, let's implement JWTs in JavaScript, specifically in a Node.js environment.
Building a JWT Server
Initial Setup
You'll need Node.js installed to follow along.
Let's create a new Express.js project.
Let's get started in your terminal. Make a new folder with the following command:
mkdir jwt-example
Move into this folder:
cd jwt-example
Initialize the new npm project:
npm init -y
Install our three dependencies:
npm install jsonwebtoken express body-parser
Create our only file for the project:
touch index.js
Now you can open this folder for coding! 👨💻
Creating a login route
Let's set up a super simple login route that signs our JWT and gives us back our token:
const jwt = require("jsonwebtoken");
const bodyParser = require("body-parser");
const express = require("express");
const app = express();

const PORT = 3000;

// Our "database" for simplicity
const users = [
  { id: 1, username: "nialljoemaher", password: "securepassword" },
];

app.use(bodyParser.json()); // for parsing application/json

const SECRET = "somesupersecretkey"; // Should be stored in environment variables and "super" private

app.post("/login", (req, res) => {
  console.log(req.body);
  // In a real app, you'd need to verify username and password, but we are learning JWTs!
  const user = users.find((u) => u.username === req.body.username);

  if (!user) return res.sendStatus(401); // No user no access

  const payload = { id: user.id, username: user.username };

  const token = jwt.sign(payload, SECRET, { expiresIn: "1h" }); // Sign a token

  res.json({ token });
});``

app.listen(PORT, () => console.log("Server is running on PORT:", PORT));
If you make a post request with the following data:
POST http://localhost:3000/login
content-type: application/json

{
    "username": "nialljoemaher"
}
You should recieve a payload with a token that looks something like this:
{
  "token": "eyJhbGciOiJIUzI1NiIsInR5cCI6IkpXVCJ9.eyJpZCI6MSwidXNlcm5hbWUiOiJuaWFsbGpvZW1haGVyIiwiaWF0IjoxNjg2MTQ5MjEyLCJleHAiOjE2ODYxNTI4MTJ9.M2_r6ZlalLY4BAAQlZKqO0boTAtQNutOnbHbag6lSaE"
}
Add middleware to confirm a JWT
Let's create some middleware to confirm our JWT before we hit a route "protected" route:
// Middleware placed AFTER your login route so that you don't need this middleware to login.
app.use((req, res, next) => {
  const authHeader = req.headers.authorization;

  if (authHeader) {
    const token = authHeader.split(" ")[1]; // Bearer <token>

    jwt.verify(token, SECRET, (err, user) => {
      if (err) return res.sendStatus(403); // Forbidden

      req.user = user;

      next(); // pass the execution off to whatever request the client intended
    });
  } else {
    res.sendStatus(401); // Unauthorized
  }
});

// Protected route
app.get("/protected", (req, res) => {
  res.json({ message: "You are in the protected route!", user: req.user });
});
The /protected route can now be accessed with a valid JWT. It will fail with a 401 status code if no token is provided or with a 403 status code if the token is invalid.
Restart your server fetch a new token from your /login route and now let's GET our /protected route with a request using a Authorization header.
Example request structure:
GET http://localhost:3000/protected
Authorization: Bearer eyJhbGciOiJIUzI1NiIsInR5cCI6IkpXVCJ9.eyJpZCI6MSwidXNlcm5hbWUiOiJuaWFsbGpvZW1haGVyIiwiaWF0IjoxNjg2MTUwMzg3LCJleHAiOjE2ODYxNTM5ODd9.4_ZCDDtf__zwCGDm7AIvVc-uOKe-9VwrOpm9ddpebNE
If you have a valid token you should now see a response with the following structure:
{
  "message": "You are in the protected route!",
  "user": {
    "id": 1,
    "username": "nialljoemaher",
    "iat": 1686150387,
    "exp": 1686153987
  }
}
And that's how you can use JWTs for authentication in an Express.js application. It's a clean, effective, and widely-used method of handling user authentication.
You can find the complete code here.
Follow me on Twitter or connect on LinkedIn.
🚨 Want to make friends and learn from peers? You can join our free web developer community here. 🎉
Founder of Codú - The web developer community! I've worked in nearly every corner of technology businesses: Lead Developer, Software Architect, Product Manager, CTO, and now happily a Founder.
Loading discussion...
Hey! 👋
Got something to say?
or to leave a comment.