 Daniel Callaghan8 min read
What I learned in work this week - Javascript Bundlers
Intro
My name is Daniel, and I work for a company that makes insurance software. It is my first tech job and I am learning a lot since starting.
Lately I have been working on updating one of our projects from Webpack 4 to Webpack 5, so this is the topic of this post.
There are many technical guides out there about this subject, so I will link some resources at the end. I will focus on some higher level details that were not so obvious to me when I started on this task. I have some code examples here but I wouldn't invest too much time reading them, they are just for context and you can find similar in the webpack documentation.
![]()
What is a bundler and why do we need it?
In the early days of web development, building a website was simpler: HTML was used for structure, CSS for style, and perhaps a little JavaScript for creating a popup.
When JavaScript began to be used for more complex tasks such as rendering HTML, file sizes grew, and the need to import and combine different files became necessary. JavaScript is different to other languages like Java or Python in that it did not really have a native way of doing this, so developers would just add a lot <script> tags to an HTML file, making it difficult to maintain and slow to load in the browser. Bundlers were made to address this issue.
A bundler is a useful build tool that combines our JS assets into one optimized, production-ready file. When using a bundler like Webpack, the code can be split into different bundles based on its function and level of change. For example, vendor code such as React, jQuery or Lodash, can be split into a separate file and cached in the browser, reducing the amount of data that needs to be loaded when a user visits the site again.
Architecture overview
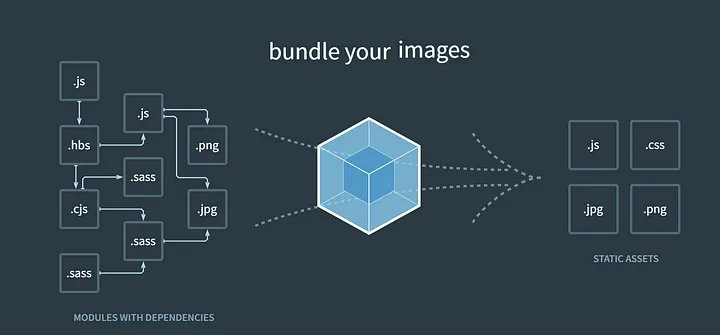
On a high level, the process starts with an entry point, then webpack does some internal magic, and then we are left with our output files.
Entry
Everything in webpack is a module including the webpack configuration file.
module.exports = {
  entry: './path/to/my/entry/file.js',
};
The "entry" is the first file that Webpack looks at when it's bundling all the different JavaScript files together.
When Webpack processes the entry file, it creates a dependency graph by analyzing the "import" and "require" statements in the file. These statements indicate which other JavaScript files are required to run the application. By following these dependencies, Webpack can determine which files are needed and how they are related to each other.
Once Webpack has identified all the necessary files, it can then begin the process of bundling them together into a single optimized file. This optimized file can be served to the browser, where it can be used to run the JavaScript code on the web page.
There can be multiple entry files. This may be the case in a website that has multiple pages for example.
Output
The "output" option is used to specify where the bundled JavaScript code should be saved once it's been processed by Webpack.
When you configure the "output" option in Webpack, you can specify things like the name of the output file, the directory where the file should be saved, and other options like whether or not the code should be minified.
Here is a quick example to see the process from entry to output.
webpack.config.js
const path = require('path');

module.exports = {
    entry: './src/index.js',
    output: {
        path: path.resolve(__dirname, 'build'),
        filename: 'main.js'
    },
};
src/index.js
import { name } from "./name"

console.log(`hello ${name}`)
src/name.js
export const name = 'codu'
resulting output is a self invoking function
build/main.js
(()=>{"use strict";console.log("hello codu")})();
We can specify mode: development which disables some of the optimizations that are enabled in production mode, like code minification and tree shaking.
Output in development mode.
/*
 * ATTENTION: The "eval" devtool has been used (maybe by default in mode: "development").
 * This devtool is neither made for production nor for readable output files.
 * It uses "eval()" calls to create a separate source file in the browser devtools.
 * If you are trying to read the output file, select a different devtool (https://webpack.js.org/configuration/devtool/)
 * or disable the default devtool with "devtool: false".
 * If you are looking for production-ready output files, see mode: "production" (https://webpack.js.org/configuration/mode/).
 */
/******/ (() => { // webpackBootstrap
/******/ 	"use strict";
/******/ 	var __webpack_modules__ = ({

/***/ "./src/index.js":
/*!**********************!*\
  !*** ./src/index.js ***!
  \**********************/
/***/ ((__unused_webpack_module, __webpack_exports__, __webpack_require__) => {

eval("__webpack_require__.r(__webpack_exports__);\n/* harmony import */ var _name__WEBPACK_IMPORTED_MODULE_0__ = __webpack_require__(/*! ./name */ \"./src/name.js\");\n\n\nconsole.log(`hello ${_name__WEBPACK_IMPORTED_MODULE_0__.name}`)\n\n//# sourceURL=webpack://webpack5/./src/index.js?");

/***/ }),

/***/ "./src/name.js":
/*!*********************!*\
  !*** ./src/name.js ***!
  \*********************/
/***/ ((__unused_webpack_module, __webpack_exports__, __webpack_require__) => {

eval("__webpack_require__.r(__webpack_exports__);\n/* harmony export */ __webpack_require__.d(__webpack_exports__, {\n/* harmony export */   \"name\": () => (/* binding */ name)\n/* harmony export */ });\nconst name = 'codu'\n\n//# sourceURL=webpack://webpack5/./src/name.js?");

/***/ })

/******/ 	});
/************************************************************************/
/******/ 	// The module cache
/******/ 	var __webpack_module_cache__ = {};
/******/
/******/ 	// The require function
/******/ 	function __webpack_require__(moduleId) {
/******/ 		// Check if module is in cache
/******/ 		var cachedModule = __webpack_module_cache__[moduleId];
/******/ 		if (cachedModule !== undefined) {
/******/ 			return cachedModule.exports;
/******/ 		}
/******/ 		// Create a new module (and put it into the cache)
/******/ 		var module = __webpack_module_cache__[moduleId] = {
/******/ 			// no module.id needed
/******/ 			// no module.loaded needed
/******/ 			exports: {}
/******/ 		};
/******/
/******/ 		// Execute the module function
/******/ 		__webpack_modules__[moduleId](module, module.exports, __webpack_require__);
/******/
/******/ 		// Return the exports of the module
/******/ 		return module.exports;
/******/ 	}
/******/
/************************************************************************/
/******/ 	/* webpack/runtime/define property getters */
/******/ 	(() => {
/******/ 		// define getter functions for harmony exports
/******/ 		__webpack_require__.d = (exports, definition) => {
/******/ 			for(var key in definition) {
/******/ 				if(__webpack_require__.o(definition, key) && !__webpack_require__.o(exports, key)) {
/******/ 					Object.defineProperty(exports, key, { enumerable: true, get: definition[key] });
/******/ 				}
/******/ 			}
/******/ 		};
/******/ 	})();
/******/
/******/ 	/* webpack/runtime/hasOwnProperty shorthand */
/******/ 	(() => {
/******/ 		__webpack_require__.o = (obj, prop) => (Object.prototype.hasOwnProperty.call(obj, prop))
/******/ 	})();
/******/
/******/ 	/* webpack/runtime/make namespace object */
/******/ 	(() => {
/******/ 		// define __esModule on exports
/******/ 		__webpack_require__.r = (exports) => {
/******/ 			if(typeof Symbol !== 'undefined' && Symbol.toStringTag) {
/******/ 				Object.defineProperty(exports, Symbol.toStringTag, { value: 'Module' });
/******/ 			}
/******/ 			Object.defineProperty(exports, '__esModule', { value: true });
/******/ 		};
/******/ 	})();
/******/
/************************************************************************/
/******/
/******/ 	// startup
/******/ 	// Load entry module and return exports
/******/ 	// This entry module can't be inlined because the eval devtool is used.
/******/ 	var __webpack_exports__ = __webpack_require__("./src/index.js");
/******/
/******/ })()
;
A lot of extra internal webpack code here, but what is fascinating is how webpack makes key value pairs out of each file, where the key is the filename and the value is the page wrapped as a function.
eg:
"./src/index.js": ((__unused_webpack_module, __webpack_exports__, __webpack_require__) => {

eval("__webpack_require__.r(__webpack_exports__);\n/* harmony import */ var _name__WEBPACK_IMPORTED_MODULE_0__ = __webpack_require__(/*! ./name */ \"./src/name.js\");\n\n\nconsole.log(`hello ${_name__WEBPACK_IMPORTED_MODULE_0__.name}`)\n\n//# sourceURL=webpack://webpack5/./src/index.js?");

/***/ }),
"./src/name.js": ((__unused_webpack_module, __webpack_exports__, __webpack_require__) => {

eval("__webpack_require__.r(__webpack_exports__);\n/* harmony export */ __webpack_require__.d(__webpack_exports__, {\n/* harmony export */   \"name\": () => (/* binding */ name)\n/* harmony export */ });\nconst name = 'codu'\n\n//# sourceURL=webpack://webpack5/./src/name.js?");

/***/ })
The entry and output are easy to grasp. Lets look at some process that happen in between.
Loaders
By default Webpack only understands javascript. If we want to use other types of files, like CSS or images, we need to use "loaders". Loaders are special modules that tell Webpack how to read and process different types of files.
For example, if we want to use CSS in our project, we can add a CSS loader to our Webpack configuration. We do this by setting the module option and adding a "test" to match CSS files. When Webpack comes across a CSS file, it knows to use the CSS loader to read and process the file.
The CSS loader takes the CSS file and converts it into a format that can be used by the browser, typically JavaScript.
const path = require('path');

module.exports = {
    entry: './src/index.js',
    output: {
        path: path.resolve(__dirname, 'build'),
        filename: 'main.js'
    },
    module: {
        rules: [
          { test: /\.css$/, use: 'css-loader' },
        ],
      },
};
Plugins
Webpack plugins are a powerful way to extend and customize the build process. Plugins can be used to perform a wide range of tasks, from generating HTML files to optimizing the build output. For example, we can use the HtmlWebpackPlugin to automatically generate an HTML file based on the contents of the build output. We can also use optimization plugins to minimize and compress files, or to separate CSS files into separate files.
Essentially, plugins are hooks that can be called at different stages of the build process to perform specific tasks. Since they are hooks, we can write and define our own custom plugins to do anything we made need.
Chunking
We can use chunking to break up larger JavaScript files into smaller files or "chunks". We already mentioned one application of this in the beginning and that is splitting our app code from vendor code. These chunks can be loaded separately as needed, which can help to improve the performance and speed of your application.
For example, let's say you have a large JavaScript file that contains all of your application's code. When a user loads your website, they have to download the entire JavaScript file before your application can start running. This can take a long time and slow down the user experience.
By breaking up your code into smaller chunks, you can reduce the amount of code that needs to be downloaded and loaded, which can make your application faster and more responsive.
const path = require('path');

module.exports = {
    entry: './src/index.js',
    output: {
        path: path.resolve(__dirname, 'build'),
        filename: 'main.js'
    },
    module: {
        rules: [
          { test: /\.css$/, use: 'css-loader' },
        ],
      },
      optimization: {
        splitChunks: {
          chunks: 'all',
        },
      },
};
This option tells Webpack to split chunks that are shared between multiple entry points into separate files, and to include those files as script tags in the HTML output.
The chunks: 'all' option tells Webpack to apply this rule to all chunks, including both synchronous and asynchronous chunks. This means that any modules that are used in multiple parts of the application will be split out into a separate chunk that can be loaded independently. Another way of thinking of that is if I am importing React in a lot of files. I don't wan't React code to be duplicated in every file so extract it out, put into its own react chunk and use as needed.
A chunk may be asynchronous when it is dynamically imported. For example a user clicks on a button, and we tell our application to load in code from another file when that happens.
eg:
const btn = document.getElementById('btn');

btn.addEventListener('click', () => {
  import('./module.js')
    .then(module => {
      module.doSomething();
    })
    .catch(error => {
      console.log('An error occurred while loading the module');
    });
});
Webpack Dev Server
Webpack Dev Server is a development tool that allows you to run a local web server with live reloading and hot module replacement. It will watch your files and if you change some code, it will auto refresh the page and change only what you changed inside of a module and not everything on the page.
The main thing to watch out for here, and something that confused me quite a bit at first was that webpack dev server builds and serves your assets from memory and doesn't actually make any physical files. This means that you need to specify the location of any files that exist outside of a module, such as .png or .svg files. While webpack copies these files to your build folder at build time, you need to specify them explicitly for webpack dev server to work correctly.
const path = require('path');

module.exports = {
    entry: './src/index.js',
    output: {
        path: path.resolve(__dirname, 'build'),
        filename: 'main.js'
    },
    module: {
        rules: [
          { test: /\.css$/, use: 'css-loader' },
        ],
      },
      optimization: {
        splitChunks: {
          chunks: 'all',
        },
      },
      devServer: {
        contentBase: path.join(__dirname, 'public'),
        port: 3000,
        open: true,
    },
};
I hope some of that was helpful. It is a huge subject and I am still learning about it. There is plenty of things I have not covered here but this should give you a high level, and hopfully accurate overview of what is going on.
In my personal projects if I need a bundler I use Vite, it is much faster but the webpack ecosystem is more robust and is a good skill to have if you are job hunting.
Some useful resources I found while working on this task:
Thanks so much if you made it this far.
All the best,
Daniel
Software engineer at Guidewire Software. I like React, next and board games.
Discussion 0
Got something to say?
or to join the conversation.